OLD HOMESCHOOLERS NEVER DIE . . . THEY JUST WRITE CURRICULUM


"Let my teaching fall like rain and my words descend like dew,
like showers on new grass,
like abundant rain on tender plants."

Deuteronomy 32:2

Courses of Study

To view the Course of Study for each grade level, you can click on the "Course of Study" label
or "Search This Blog" for the specific grade level you wish to see.
To date, I have courses of study completed for kindergarten through fourth grades.

Newsletter Articles

In 2013 the Lord started me producing a newsletter for the homeschool group we are a part of. Every other month I write an article on a topic the Lord has put on my heart. I've decided to add these articles to this blog. I hope you will find encouragement through some of my ramblings. You can click on the label "Newsletter" to find the articles.
Showing posts with label Science. Show all posts

Wednesday, October 5

Science: Geology

Here is a list of books we used in our unit on Geology. I used the Geology badge in American Heritage Girls as our outline, so I'll reference the requirements, just in case your daughter is an Explorer in AHG, also.

Identify 10 rocks (requirement #8)
  • Can You Find These Rocks? by Carmen Bredeson
  • Rock Study: A Guide to Looking at Rocks by Steven M. Hoffman
Do a Perc Test (requirement #9)
Learn about the water cycle (requirement #10)
  • The How and Why Book of Weather by George Bonsall --pages 23 - 25
  • Understanding Cycles and Systems by Andrew Solway -- pages 14 - 15
Grow crystals (option #11)
Learn about sedimentary, igneous, and metamorphic rocks (option #12)
  •  How do Water and Wind Change Rock?: a Look at Sedimentary Rock by Ellen Lawrence
  • Baking and Crushing: a Look at Metamorphic Rock by Ellen Lawrence
  • How do Volcanoes Make Rock?: a Look at Igneous Rock by Ellen Lawrence
    • These books are park of the Rock-ology: the Hard Facts about Rocks series. I would highly recommend reading all the books in the series. They are easy reads with lots of photos and other illustrations.
  • The Beauty & Mystery of Water by Hans Walter Silvester -- lots of pictures to look at and marvel over
Learn about caves, etc. (options #13)
  • Exploring Caves by Melody S. Mis
  • The Science of a Sinkhole by Robin Koontz
  • Caves and Caverns by Gail Gibbons
  • Caves: Mysteries Beneath Our Feet by David L. Harrison
  • Into the Earth: the Story of Caves by Meredith Costain
  • Caves by Marcia Zappa
  • The Secret Cave: Discovering Lascaux by Emily Arnold McCully
  • Virtual tours of caves/caverns
Here are some other books that may enhance your geology unit.
  • How Do People Use Rocks?  by Ellen Lawrence
  • What are Rocks Made Of? by Ellen Lawrence
  • Crystals by Richard and Louise Spilsbury
  • Landslides, Slumps, & Creep by Peter Goodwin
  • Investigating the Rock Cycle by Mary Lindeen
  • Erosion and Weathering by Willa Dee
  • Earth Evidence by Michael Martin
  • Erosion: Changing Earth's Surface by Robin Koontz

Thursday, September 29

Science Ideas

I'm starting a list of books that I think would be great to use for science.

  • 50 Gardening Projects for Kids by Clare Bradley
  • Understanding Cycles and Systems by Andrew Solway

Sunday, May 24

Fourth Grade, Science, Set Three

Elementary Life Science
  • Chapter Eleven: Reptiles and Amphibians
    • Activity: Took the temperature at different places and times in the house to find out where cold-blooded animals would want to live (75 - 85 degrees F)
  • Chapter Twelve: Life Cycles of Birds, Mammals, and Insects
    • Activity: Did this really cool activity to demonstrate the life cycle of a butterfly. Four strips of construction paper are 2" x 8-1/2", one is 2" x 11".
      Eggs

      Caterpillar

      Chrysalis

      Butterfly
  • Chapter Thirteen: Classifying Animals
    • Activity: Classifying Donuts -- we bought a glazed, old fashioned, bear claw, twist, and apple fritter and classified them. After that K. asked her dad questions to see if he could figure out the donuts by their classification. For example, Which donut is bumpy and has a hole? Which donut is not bumpy, not round, and not twisted?
  • Chapter Fourteen: Classifying Plants
    • Activity: Put white carnations in colored water to see how water moves through a plant.
  • Chapter Fifteen: Classifying Fungi and Protists
    • Activity: Get two bottles of soda pop. Empty one and fill it with water. Put a teaspoon of yeast into each bottle, mix it up, put deflated balloon over the mouth of the bottle. Leave for 24 hours.

Fourth Grade, Science, Set Two

Elementary Life Science
  • Chapter Six: More Forest Biomes
    • Activity: Put a thermometer in a white sock and in a black sock, then put them both in the sun; compared the temperatures after 15 minutes
  • Chapter Seven: Tundras and Desert
    • Activity: Made permafrost by mixing dirt and water, then freezing it. Set a building (made of clay) on stilts (toothpicks) and then on the permafrost. Let the permafrost melt and watched what happened to the house. We also looked at pictures on the internet of houses effected by thawing permafrost.
  • Chapter Eight: Aquatic Biome
    • Activity: Fix three glasses of water with different concentrations of salt, add a different food color to each glass. Insert the straw into the salt-free water, cover the end to keep the water in. Insert the straw into the the low-salt water, remove your finger to allow water to enter; cover again. Do the same with the high-salt water. Here are directions.
  • Chapter Nine: Species and Offspring
  • Chapter Ten: Plant Structure
    • Activity: Put beans in small zippered bags and compared their sprouting after a week.
      • with moist paper towel in dark place
      • with moist paper towel in direct sun
      • with moist paper towel in indirect sun
      • with dry paper towel
      • with a cup of water

Saturday, February 28

Fourth Grade, Science, Set One

Elementary Life Science
Along with reading each chapter and completing the worksheets, we also completed at least one activity for each chapter. I'm only listing one activity for each chapter here.
  • Chapter One: Living and Non-Living Things
    • Activity: Put items in a bag, K. would pick up an item, describe it and decide if it was biotic or abiotic
  • Chapter Two: Material and Non-Material Resources
    • Activity: Identifying true cycles of life
  • Chapter Three: Reduce, Reuse, and Recycle
    • Activity: Made paper by recycling a sheet of an old newspaper
  • Chapter Four: Habitats and Niche
    • Activity: Looked at a drop of pond water under a microscope
  • Chapter Five: Grasslands and Forests
    • Activity: Fill 2 flower pots with dirt. Put a thermometer the same depth in each. Put one in the sun and the other in the freezer. What is the difference in temperature on top of the dirt and under the dirt. Discuss why animals burrow.

Friday, January 30

Third Grade, Science, Set Seven

We did some different things during this set.
  1. We completed the last three Nature Friend magazines.
  2. We watched a pumpkin rot.
    • First, we carved it and let a candle burn in it for six (or so) hours.
    • Then we put it outside by our compost pile.
    • We put an un-cut pumpkin by it for our control
    • Each day K. journaled the progress of its decomposition.
  3. We learned about Thomas Edison.
    • I had a study guide/activity book that went with a video about Edison.
    • We watched the video and completed selected sections of the book.
  4. We learned about the Galapagos Islands.
    • In Clipper Ship (see Reading) they mentioned the Galapagos Islands, so I thought it would be fun to learn more about them.
    • Here are the books we read:
      • Galapagos Islands by Cynthia Kennedy Henzel
      • Into Wild Galapagos by Jeff Corwin
      • A Galapagos Island Food Chain by Rebecca Hogue Wojahn
      • We're Off . . . to the Galapagos by Michael Mastorakis
      • "Galapagos" Means "Tortoises" by Ruth Heller
      • We're Sailing to Galapagos: A Week in the Pacific by Laurie Krebs

Friday, October 17

Third Grade, Science, Set Six

Along with reading Nature Friend Magazines, we completed about five work pages from the Long Beach Aquarium. We went there on their homeschooler's day. I had printed out these papers to do while we were there, but we were too busy enjoying ourselves to do them then. I decided we could do them as well after our visit, using the Internet to find answers to questions we didn't know. It was actually fun, and made the experience last longer and we learned more.

K. was sick during our week off, so I decided not to insist on her doing a project.

Sunday, September 7

Third Grade, Science, Set Five

This time K.'s project was to create a bug and tell about it. I had her go through boxes of saved stuff -- soap bottles, tubes, cartons, cans, foam trays, etc. -- and pull out something to use for a head, a thorax, and an abdomen. I helped her attach them together. We made legs and wings and attached antenna. Then (because she doesn't like messy fingers) I covered it all with newspaper dipped in starch. Then she painted it. Her bug is called a Colton. I gave her eight questions to answer about the bug. Such as: where does it live, what does it eat, how does it defend itself, what is it's life cycle. She made a poster to answer these questions. She never really got excited about making the bug, but she liked making the poster.

Sunday, August 3

Third Grade, Science, Set Four

Here is the poster about the platypus.


We are continuing to read one Nature Friend magazine each week, getting more books from the library to learn more about some animals or subjects. K.'s project after set four was identifying birds on our vacation.

Sunday, May 25

Third Grade, Science, Set Three

We are continuing to enjoy reading the Nature Friend magazines. K's project  is a poster about the platypus. I'll put a picture up when she finishes.

Monday, April 28

Third Grade, Science, Set Two

We are enjoying reading the Nature Friend magazines. K. really enjoys finding books at the library about animals. Here are pictures of her first two projects.

 
This is a poster she did about dolphins. She wrote a report, drew a picture, and found some pictures to print.

 
One week during Set Two, K. picked up a book about the difference between lizards and salamanders. On her own, she began writing a report, so I suggested she use this subject for her second project. She completed the report, did a Venn diagram, made this diorama of their habitats, and labeled a diagram of a lizard's body.

Sunday, February 9

Third Grade, Science, Set One

We are reading one Nature Friend magazine each week. I read most of the articles to K., but on Monday I have her look through the magazine and place sticky notes on the three articles she wants to read. Two of them she reads aloud. On Friday she reads the last one silently and then I ask her four or five questions about it.
 
Also on Friday she chooses a topic to learn more about. After the first week, I learned to be more general. For instance, we aren't going to find books about harlequin ducks at the library, but we will find books about ducks. I show her the list of general subjects and have her number her first, second, and third choices. Then we go to the library website and find the catalog numbers for them. That way when we go to the library we are ready to find the books and don't have to mess with their computers, which sometimes aren't working. K. is learning how to find books using the Dewey Decimal System.
 
The first week she wanted to read more about comets.
 
The second week she chose owls.

The third week she chose whales.

The fourth week she chose birds.
 
Each magazine has a few activities (word search, crossword, etc.) that we do as we come to them. I put a plastic transparent sheet over the page (hold it still with sticky notes) and use a water base marker to write our answers. This way we can pass the magazines on to friends and they can do the activities, too.

Over the planning week she will do a project. I had planned on her doing one of the subjects she had chosen, but she wanted to do dolphins, so I decided that her being excited about learning was more important than my plan. This project will be a poster. After reading some books about dolphins, she will write things she learned on the poster and add pictures. (This is actually an assignment in our grammar book.)

Saturday, November 2

Second Grade, Science, Set Seven

Our first two and a half weeks we spent learning about heat. We used the book, Really Hot Science Projects with Temperature by Robert Gardner.
  • I read the introduction of the book, which talks about the difference between heat and temperature, to K.
  • We went on a temperature hunt (pg 10).
    • We measured the temperature in different places inside to find the warmest and coldest places.
      • Is it warmer near the floor or ceiling?
      • Is it warmer near a window or beside an inside wall?
      • Is it warmer inside or outside a closet?
      • Is it warmer upstairs or downstairs?
    • We went out side to find the warmest and coldest places.
      • Is it warmer in the sun or in the shade?
      • Are the temperatures on the north and south side of the house the same?
      • Are the temperatures on the east and west side of the house the same?
  • We took our own temperatures (pg 14). K. and I took our temperatures every two hours from the time we got up until we went to bed. We could see that our temperature changes throughout the day.
  • We froze water (pg 34). We a couple inches of water in a clear plastic bottle and then put a laboratory thermometer in it. Then we put it in the freezer. We recorded the temperature every ten minutes until the water started to freeze, then every fifteen minutes. The next day we charted the information we recorded. (We left the experiment in the freezer to use in another experiment.)
  • We learned about temperature and evaporation (pg 16).
    • Set up a fan and measure the temperature in front of it before turning the fan on.
    • Turn the fan on and measure the temperature.
    • Have your child lick the back of one of their hands and hold their hands in front of the blowing fan. Which feels cooler? Is it still wet? What happened to the water?
    • Dampen a paper towel and wrap it around the bottom of the thermometer. Hold it in front of the blowing fan. What is the temperature?
    • Does evaporation cause a drop in temperature?
  • We took the temperature outside (pg 18).
    • Put a thermometer outdoors in a place where it will be in the shade all day.
    • Starting when you get up in the morning, record the temperature every hour until you go to bed at night.
    • The next day make the information into a chart.
      • Did the temperature increase or decrease faster?
      • What was the hottest time of day?
  • Endothermic or Exothermic? (pg 30). This is really fun!
    • Put 100 ml of water in a glass (make sure your thermometer will fit in the glass). Record the temperature of the water. Add two tablespoons of Epsom salts to the water and stir to dissolve. Measure the temperature of the solution.
    • Put 100 ml of 3% hydrogen peroxide in a container. Record the temperature of the hydrogen peroxide. Put the container in the sink, add 2-1/2 teaspoons of dry yeast (one packet) to the hydrogen peroxide and stir. Push aside some of the foam and measure the temperature of the liquid.
  • Melting Ice (pg 36)
    • Set a thermometer in a warm room and record the temperature.
    • Take the ice and thermometer from the freezer. Set it in the same vicinity as the "room temperature" thermometer.
    • Record the temperature of the ice/water every ten minutes until it reaches room temperature. Ours took five hours and twenty minutes to come to room temperature.
  • Seasonal Temperatures (pg 24 and 26)
    • Take a thermometer outside and place it so it faces the sun -- the top of the thermometer  will point away from the sun (the thermometer should cast a long shadow). Record the temperature.
    • Change the angle of the thermometer so its top is pointing toward the sun -- the bulb should still be in the sunlight (the thermometer will have a very small shadow). Record the temperature.
    • Take a flashlight and shine it directly over the tropic of Capricorn on a globe. This is where the sun is on the first day of winter. Then, without changing the angle of the flashlight, move it so it shines on where you live. Does the light cover more area?
    • Next, shine the flashlight directly over the tropic of Cancer on the globe. This is where the sun is on the first day of summer. Then, without changing the angle of the flashlight, move it so it shines on where you live. Does the light cover more area?
    • Talk about why it is cooler and warmer in certain seasons.
  • Moving Liquids by Temperature Difference (pg 12)
    • Fill one cup with hot tap water; use several drops of food coloring to color it.
    • Fill a second cup with cold water.
    • Fill an eyedropper with hot water from the first cup.
    • Place the end of the eyedropper on the bottom of the cup of cold water. Squeeze out a drop into the cold water. What happens?
Notes:
  • On the all day long temperature measuring experiments, if you miss a time, or forget to start as soon as you get up, keep going with it. We did, and we were still able to see the desired results.
  • When moving thermometers, we let them sit for three minutes before recording the temperatures.
Then we went on to learn about water. I used two books from the library for the experiments.
  • Science Experiments with Water by Sally Nankivell-Aston (ww)
  • Super Simple Things to do with Water by Kelly Doudna (ss)
Here's what we did:
  • I started off by reading a couple books to K.
    • What is the World Made Of? by Kathleen Weidner Zoehfeld -- this book is about solids, liquids, and gases. There are a few activities at the back of the book. We made a chart of solids, liquids, and gases
    • A Drop of Water by Walter Wick -- we looked at the pictures in this book
  • Water Everywhere (ww pg 4) I read the introduction to K.
  • Water on the Move (ww pg 6) -- this shows why water towers are higher than the houses

    • You will need a funnel, a piece of tubing, water proof tape, a pitcher, transparent outer case of a ball point pen, water, and two people
    • Use the tape to attach the funnel to one end of the tubing and the pen case to the other.
    • Hold the pen case upright and higher than the funnel.
    • Pour water into the funnel until the tube is filled and the funnel is half full.
    • Lift the funnel higher than the pen case.
  • Cold as Ice (ww pg 8) -- this shows that water expands when it freezes
    • Fill a balloon with water and tie the balloon.
    • Draw a line around the balloon and measure the distance around the balloon on the line.
    • Put the balloon in the freezer until it is completely frozen.
    • Measure around the balloon again.
  • Vanishing Water? (ww pg 10) -- this shows the water cycle

    • You will need: a clear glass bowl, modeling clay, hot tap water, and clear plastic wrap
    • Use the clay to make the banks of a lake, about one-third of the way up the side of the bowl. You can stick small plastic animals, etc. in the clay to make a scene.
    • Fill the lake with hot tap water.
    • Quickly stretch the plastic wrap over the top of the bowl and seal it around the bowl.
    • Set the bowl in the sun for a few hours.
  • Bottled Up (ss pg 8) -- this shows air pressure pushing the water out of the bottle

    • You will need a baking pan (or sink), an empty bottle with a screw-on cap (it works easiest if the bottle is not squishy), nail or screw or ice pick, water
    • Poke a hole near the bottom of the bottle.
    • Hold your finger over the hole and fill the bottle with water.
    • Screw the lid on the bottle.
    • Hold the bottle over the pan or a sink and remove your finger from the hole. What happens?
    • Unscrew the bottle cap. What happens?
  • Boiling Hot (ww pg 12) -- shows water changing from a liquid to a gas

    • Make some tongs by attaching a clothes pin to a wooden dowel (we used a rubber band).
    • You will also need: aluminum foil container, candle, and matches
    • Light the candle.
    • Attach the aluminum foil container to the tongs. Put a small amount of water in the container.
    • Hold the container over the candle flame.
    • It is supposed to boil. Ours did not, but we could still see steam rising. If yours boils, you may want to keep it over the fire until all the water has turned to steam.
  • Water's Skin (ww pg 16 and ss pg 14) -- this shows surface tension
    • You will need a tray of water, dish washing liquid, thin plastic, eye dropper, 40 toothpicks
    • Cut a fish from the thin plastic. Cut a funnel shape out of the tail.
    • Put the fish at one end of the tray of water, facing the opposite end.
    • Drop one drop of dish soap in the funnel of the fish. The dish soap breaks the surface tension and the fish goes "swimming" to the other end of the tray.
    • Dump out the water, make sure you get all the soap out of the tray. Put clean water in.
    • Carefully place the toothpicks on the surface of the water.
    • Drop one drop of soap in the middle of the tray. What happens?
  • Sealed Up Tight (ss pg 17) -- a thin layer of water keeps the water inside the glasses
    • You will need a jar, a cloth, the sink, and an index card
    • Put the cloth over the jar and push the cloth down into the jar.
    • Fill the jar most of the way full with water.
    • Pull the cloth down around the outside of the glass until the cloth is stretched tight.
    • Put one hand over the top of the jar and turn the jar over with your other hand (continuing to hold the cloth tightly across the opening of the jar).
    • Remove your hand from the opening of the jar. What happens?
    • Fill the jar with water all the way to the top.
    • Put the index card over the mouth of the jar. Hold it in place while you turn the jar upside down.
    • Remove the hand that is holding the index card. What happens?
  • Liquids that Float (ww pg 20) -- learning about density
    • Use sand, pebbles, and shells to make an ocean scene in the bottom of  clear bowl.
    • Add water. You can also float a boat on the water.
    • Pour some cooking oil into the water. What happens?
    • Stir the oil and water. What happens?
    • Add some dish soap. What happens?
    • Stir the dish soap in. What happens?
  • Straw Pole (ss pg 20) -- more about density
    • You will need: 4 jars, food coloring, salt, teaspoon, clear straw, and an index card
    • Fill each jar with water.
    • Add ten drops of a different food color to each jar.
    • From left to right, add salt to each jar. One teaspoon to the jar on the left, two teaspoons to the next one, three teaspoons to the next, and four teaspoons to the last jar.
    • Stir until the salt is dissolved.
    • Going from left to right, stick one end of the straw about one inch into the water. Put your finger over the other end of the straw to hold the water in.
    • Put the straw straight down into the next jar, about two inches. Remove your finger, then replace it.
    • Do the same with the third and fourth jars.


    • The colors don't mix because the salt has made the water be different densities.
    • Now take the jar on the left and the one on the right. Put then in a baking pan.
    • Fill the jars until they are completely full.
    • Place the index card over the jar that was on the left (the one that had just one teaspoon of salt added to it).
    • Hold the card in place as you turn the jar upside down.
    • Set the jar on top of the other jar and line up the jar rims.
    • Have someone hold the jars in place while you slowly pull out the index card.

  • Water Power (ww pg 28) -- shows that the energy from moving water can move things
    • You will need: two ping pong balls and two water squirter bottles.
    • Mark the balls so you know which belongs to which person.
    • Use the water squirters and see who can get their ball to the finish line first.
      • We used a groove between slabs of cement for our track. I marked the middle with chalk as the finish line, and we each started from opposite ends.

Tuesday, September 17

Second Grade, Science, Set Six

We are learning about and experimenting with one simple machine each week. The two books I'm using for experiments are:
  • Mighty Machines by Shar Levine and Leslie Johnstone -- experiments from this book will be denoted by (MM)
  • Simple Machines by Deborah Hodge -- experiments from this book will be denoted by (SM)

Levers
  • We started out the week by reading the book Levers by Chris Oxlade -- it teaches what a lever is, the three classes of levers, and shows many ways levers are used in everyday life. The photos in the book are large and colorful with just three or four sentences on each page.
  • (MM) page 14 -- experiments to see the three different classes of lever at work; you just need a spring scale, a rod or yard stick, a small bag of rice or pebbles, and a chair. Use the chair for your fulcrum. Use the spring scale to measure the amount of force it takes to keep the lever level when:
    • the fulcrum is in the center and the load (rocks) is at one end and the force (scale) is at the opposite end.
    • the fulcrum is at one end, the load is in the center, and the force is at the opposite end.
    • the fulcrum is at one end, the force is in the center, and the load is at the opposite end.
  • (SM) page 4 -- Table Trick -- you need a sturdy table, a chair with a strong back, a broom handle, and a volunteer or a heavy box. Have the volunteer sit or lay on the table. Put the chair with its back to the table. Use the chair back as the fulcrum and lift the table with the broom handle. You may want to have your child try to lift the table with their hands first. Have them experiment with lifting the table with different length levers. They will find that the longer the lever (on the side opposite the table) the easier it is to lift the table and volunteer.
  • (MM) page 16 -- You need four tennis balls and a bat. Go to the park (if you don't have a big back yard) and put one ball down on the ground. Put one hand close to the small end of the bat, and the other hand (second hand) as far down the bat as you can reach. Hit the ball. Get the next ball. Move your second hand up the bat a ways and hit the ball. Get the third ball. Move your second hand up the bat more and hit the ball. Repeat with the fourth ball. Which ball went the farthest? This experiment plays very well off yesterday's experiment. Also, Curious George has a good episode about leverage.
  • (SM) page 6 -- Balancing Act -- use a ruler, blocks, and a fulcrum, such as a toilet paper tube cut in half. Experiment with balancing blocks. Put some blocks far from the fulcrum and some close to the fulcrum -- Can you make it balance?
Wheels and Axles
  • We read the book Wheels by Chris Oxlade -- it tells all about wheels, axles, gears, and shows them in use
  • (MM) page 26 -- this experiment shows how adding a wheel to the axle makes turning it easier. Put two chairs back to back, about 1 foot apart. Place a broom stick across the backs of the chairs. Fasten a bucket to the broom stick with a length of string or yarn, etc. Put a small load in the bucket (we used sidewalk chalk). Turn the broom stick to raise the bucket. Then add a ruler to the end of the broomstick. (You can use tape.) Use the ruler to turn the broom stick.

  • (SM) page 10 -- Candy Collector -- Make a pinwheel with a pencil for the axle. Attach a piece of candy to a string and the other end of the pencil. The instructions have you put the pencil in two slots of a half gallon juice container, but our would not stay in place, so I made holes for the pencil and put a rubber band on one end. As the child blows the pinwheel, the string winds up and they get the candy. Just make sure the string isn't too close to the end of the pencil, or it keeps falling off. See the video below.


  • (SM) page 12 -- Bubble Race -- You will need a hand rotary eggbeater for this experiment. Half fill two bowls that are the same size. Put 1 teaspoon of dish soap in each bowl. Do not stir it. Give one person a spoon and the other the eggbeater. Let each whip up bubbles for 30 seconds. The wheels (gears) and axle of the eggbeater allow the beaters to spin fast and make more bubbles that the person with the spoon.
  • (MM) page 28 -- this experiment shows that since a screwdriver (wheel) is bigger around than a screw (axle), it doesn't take as much effort to screw the screw in. Get a piece of styrofoam and a screw. Try to screw the screw into the styrofoam with your fingers. Then try it with the screwdriver.
  • (SM) page 8 -- Whacky wheels -- make two cars by cutting a half gallon juice box in half from top to bottom. give one wheels by using colored pencils and spools. Make a ramp by placing one end of a board on a stack of books. Put both cars at the top of the ramp and let go. The car without wheels doesn't move down the ramp as well as the car with wheels because of friction. Wheels reduce the amount of friction so that the other car can zoom down the ramp.

Inclined Planes and Wedges
  • We read Ramps and Wedges by David Glover -- this book explains ramps and wedges and has lots of illustrations to show them in use.
  • (SM) page 18 -- Egg drop -- You will need two eggs, a plate, a food can, an empty aluminum foil box. Cut the top and one end from the box to make a ramp. First, place your hand on the can and drop one egg onto the plate. Next, set the top of the ramp on the can and roll the egg down the ramp. Both eggs went from the height of the can to the table, but the ramp lessened the force of the egg. The egg had to travel farther, but it had a safer landing. An inclined plane allows you to lower or lift heavy objects using less force, but you must move the object a greater distance.
  • (SM) page 26 -- Funny face -- You need a paring knife, a carrot, a soft apple (such as Golden Delicious) or a pear. Cut the carrot into 1/4" slices. Try to push a slice of carrot into the apple. Then cut a carrot slice into a point (wedge) and push the point into the apple. Which is easier?


  • (MM) page 38 -- You will need a piece of styrofoam, an unsharpened pencil, and a sharpened pencil. First, try to push the unsharpened pencil into the foam. Then try the sharpened pencil. Which is easier? The sharp end of the pencil is a wedge. The wedge changes the direction of the force: you push down, but the wedge pushes down and sideways.
  • (SM) page 20 -- Marble lift -- Make a ramp by putting one end of a board on top of a pile of books. Attach 2 yogurt cups to string or yarn. The yarn should be just a little longer than your ramp. Tie the other end of the yarn to toy trucks or cars. Put the cars at the bottom of the ramp and hang the yogurt cups over the end. start putting marbles or coins in the yogurt cups. How many does it take to pull the truck up the ramp? Change the height of the ramp. Now how many marbles does it take? The steeper the inclined plane, the more force (marbles) you must use.

  • (MM) page 32 -- Make a ramp by putting one end of a board on top of a pile of books. You will need your bag of rocks or rice (weight), a spring scale, and a toy truck. First, use the scale to pull the weight up the ramp. Check the scale to see how much effort it took. Next, place the weight at the bottom of the stack of books and use the scale to lift it to the top of the stack. Does this take more or less effort? Last, put the weight in the truck and pull the truck up the ramp with the scale. How much effort does it take? You can raise and lower the ramp to see how it changes the amount of effort if takes.
  • (MM) page 34 -- Change the length of your ramp from the above experiment (longer or shorter) and see how it effects the amount of effort.
Screws
  • The book I had requested from the library on screws had not come yet, so I read the two pages about screws in Mighty Machines.
  • (MM) page 44 -- You need an unsharpened pencil with an eraser, string (2 feet long), tack, ruler. Push the tack a little ways into the eraser. Tie one end of the string around it, then push it in all the way. Hold the pencil upright on its unsharpened end. Hold the string out so that the untied end is on the table. (The table, pencil, and string will make a triangle.) Use the ruler to measure the distance from the pencil to the end of the string. Rotate the pencil so the string winds up on it. This shows that a screw is really an inclined plane wound around a rod.
  • (SM) page 22 -- You will need a tall can (Pringles can) or a thermos, a clear plastic tube, tape, a bowl half filled with water, and food coloring. Put some drops of food coloring in the water. Tape one end of the tube to the top of your container. Hold the other end at the table top (so it makes an inclined plane). Rotate the container so the tubing winds around it in a spiral. Place one end of the container and tubing in the water. Slowly turn the can until some colored water moves into the tubing. Lift the container out of the water, tilt it slightly, and keep turning it slowly. The water will climb the tube and come out the top. If it doesn't work the first time, try holding the container at a different angle. It would be difficult to make water go up a straight tube, but the spiral makes it easier.
  • (MM) page 42 -- You need different types of screws so that you have some with ridges close together and some with ridges far apart, (we used drill bits from a set for a hand drill) styrofoam, and a screwdriver. Let your child guess if it will be easier to screw one into the styrofoam that has the ridges close or far apart. Then let them try it. The one with ridges close together should be easier. Remind them of the experiments with short and long ramps. Talk about why one screw is easier than the other.
  • (SM) page 24 -- There is a pattern in the book to make a twirling "helicopter" from paper and a paper clip. We each made one and flew them. Then I took a wadded up piece of paper and dropped both it and my helicopter from the same height. We talked about why one got to the floor faster, and likened it to the egg experiment from last week. Here is a link to the same helicopter pattern.
Pulleys
  • We read Pulleys by Sarah Tieck -- this book was from a different series, and I did not like it as well. It didn't give a much information as the other books.
  • (SM) page 14 -- you need a pole (broom stick will work), an empty spool, yarn or string, ribbon, plastic bucket with a handle, and the bag of pebbles that you used before. Find a place where you can set up your pole so it is supported on both ends and is level. You can use the backs of two chairs. Thread the yarn through the spool and tie it around the pole. Tie one end of the ribbon to the bucket and thread the ribbon over the spool. Put the pebbles in the bucket. Have your child lift the  bucket. Then have them pull the ribbon (using the pulley) to lift the bucket. Which is easier? A pulley changes the direction of the force.
  • (MM) page 20 -- for this experiment you need a pole at least a couple feet off the ground, two buckets with handles, a spool, a ribbon, yarn or string, and marbles or pebbles. Find a way to position the pole so it is level -- you can put each end on a chair. Put the yarn through the spool and tie it to the pole. Tie one end of the ribbon to one bucket handle. Thread the ribbon over the spool and tie the other end to the other bucket handle. One of the buckets should not be on the floor. Have your child start putting marbles in the bucket that is not resting on the floor. What happens? This shows that a single fixed pulley lets you pull in one direction and move something in the other direction. See video below, although you will have to look at it sideways!
  • (SM) page 16 -- for this experiment you need two broom sticks, a rope, and three children (so we did this at a park day). Have two children hold the sticks about one foot apart. Tie the rope to the top of one stick, then loop the rope around both sticks a few times. Have the third child hold on to the rope, when she is ready to pull, the children holding the sticks pick them up off the ground and try to pull them apart, while child #3 is pulling on the rope. Who is stronger? The child pulling the rope should be able to force the sticks together. Each time the rope is looped around a stick, it is like a pulley. Pulleys multiply the force of your muscles, giving you extra pulling power. Here is a diagram of this experiment, although they have the broom sticks horizontal instead of vertical.
  • (MM) page 22 -- set up your pole, again, tie one end of the ribbon to the pole. Tie the yarn that goes through your spool to the bucket handle. Thread the ribbon under the spool. Lift the loose end of the ribbon. This is a pulley that moves. The bucket has two supporting belts (one from pole to pulley and second from pulley to hand) this should make the bucket seem lighter. We went on from here to make a block and tackle. To do this get another spool and put yarn through the spool and tie it to the pole. The ribbon will go from the pole under the spool attached to the bucket and over the spool attached to the pole. Now you can pull down to lift the bucket, which is easier than pulling up.

Sunday, August 4

Second Grade, Science, Set Five

Now we are learning about sound.
  • Sounds All Around by Wendy Pfeffer -- we read the book one day and then took two days to do the activities.
    • Make a guitar with a box and rubber bands
    • Make musical glasses
    • Listen to sounds around you; we went to the local nature center to do this
    • Sounds matching game -- get 10 identical containers that are not see-through and have lids. Make 5 sets of identical contents (example: put 10 paper clips in 2 containers). Mark one of each with an 'X' and the other with an 'O'. Mix up the containers and see if you can match up the sets (one X and one O) by listening to the sound it makes when you shake the container.
  • The True Book of Science Experiments by Illa Podendorf, pages 40 - 43
    • Listen to the radio, then cup your hands around your ears and notice that the sound is louder. Your hands help catch the sound waves.
    • Put a watch or clock (with a loud tick) on the table. Stand 12 inches away and listen. Then put your ear on the table, 12 inches away from the clock. The sound is louder. Sound travels better through wood than air.
    • Make a telephone with two cans and string. I pulled different ideas from other books to make a telephone that works really well.
  • Hearing Sounds by Sally Hewitt -- we read this book in three days (pgs 6 - 23) and did the activities as we went along. Here are a couple :
    • Cover a bowl tightly with plastic wrap. Put rice or colored sugar crystals on the wrap. Hold a 9 x 13 metal pan above the bowl and hit it with a wooden spoon. The rice/sugar will jump. The vibrations caused by hitting the pan make the wrap vibrate. This is sort of how your eardrum works.
    • Gather a collection of tubes and bottles. Gently blow across the top of each. Compare the sounds.

  • Sound and Hearing by John Farndon
    • Making Waves, page 5 -- we used a large slinky to show how sound waves move
    • Inside the Ear, page 13 -- we read about how the ear works
  • 49 Easy Experiments with Acoustics by Robert W. Wood
    • Hold a hacksaw blade about halfway over the edge of a table (we used a bench because our table has curved edges). Hold it very firmly. Thump the extended end with your finger. Listen to the sound the vibrations make. Move the blade so more or less is over the edge. Do the vibrations make a different sound? Try it with a yardstick and other things that will vibrate.
    • Put water in a 9 x 12 baking pan until the water is about 1" deep. Use a medicine dropper to drop one drop at a time into the pan. You can observe the waves it makes. The drop is like someone talking and the waves are like the sound waves. Hold the dropper up high and drop a drop in. Watch how the waves react when the hit the sides of the pan. This is like an echo.
    • We made an air shock wave. You may see this experiment in many books, but this one was the simplest, and it worked! You need a candle and an empty salt box. Remove the metal spout from the salt box. Light the candle (you should be away from drafts), point the opening in the salt box at the flame and thump the other end of the box. The wave of air you send out of the box will put out the flame.
    • Stand about four feet from your child and tap the table with a pencil. Then have your child put their ear on the table (still four feet away) and tap the table. Notice the difference.
    • Run your thumb down the teeth of a comb. Then fill a metal pot with water. Have your child put their ear against the pot, put your hand and comb in the water and run your thumb down it. Notice the difference. Sound carries better through wood and water than through air. Put the end of the comb against a door. Have your child put their ear on the other side of the door. The hollow door amplifies the sound.
    • Tie a sting (about 18" long) around a fork. Tie the other end onto a baking pan. (If you have one with a hole, it is easy.) Place the pan upside down on a table with the end where the string is tied on sticking over the edge so the string hangs straight and the fork is suspended in mid-air. First, lift the fork by the string and tap it with another fork. Then, let the fork hang from the pan and tap it with another fork. The pan amplifies the sound.
    • Use a stiff piece of manila folder or card stock. Cut a strip two inches wide. Fasten it around the frame a bicycle next to the wheel. You can use a clothespin, but we punched a couple holes and used a brad. Cut the paper so it touches the spokes when the wheel turns. The faster you peddle, the faster the paper vibrates, and the higher the pitch of the sound.
    • Make a spoon chime. Tie a string (2 - 3 feet long) around the handle of a spoon. Tie a small loop at each end of the string. Insert an index finger in each loop and place your fingers in your ears. Lean over so the spoon hangs in the air. Have someone tap the spoon with another spoon. Listen to the difference when you don't have your fingers in your ears.
    • Use old utensils to make a wind chime.
    • Make a stethoscope. Insert the spout of a small funnel in one end of a hose (about 18" long). Listen to your heart. Listen to a watch, etc.
    • Make a speaking tube. If you use a garden hose for this, make sure all the water is out of it. Stretch a long hose out to its full length. Have one person at each end. Whisper to each other. The hose does not need to be stretched tight, just don't let there be any kinks in it. You and go in different rooms, or around corners. Many parks have speaking tubes that work this same way.
  • 365 More Simple Science Experiments
    • Get two paper cups, glue, cotton balls, and a whistle. Glue the cotton balls to the inside of one of the paper cups. Make sure it is all covered. Blow the whistle in the paper cup without the cotton balls. Then blow the whistle in the cup with the cotton balls. The cotton balls muffle the sound of the whistle because the sound gets trapped in the tiny spaces in all the cotton balls.
Other books we read:
  • It is the Wind by Ferida Wolff -- a picture book about sounds a boy hears at night
  • The Ear Book by Al Perkins -- a book about sounds
  • The Sounds Around Town by Maria Carluccio -- a book about sounds you hear all through the day
The last week of this set we did experiments with mixtures and ice from What Happens If...?
  • Mixtures
    • Fill three classes with water. Put a drop of food coloring in one. Watch is spread. Then put a drop in the other two. Stir the water in one. In which does the color spread faster?
    • Add a spoonful of sugar to a glass of water and stir. Use a straw to taste the water at the bottom, middle, and top of the glass. What do you taste? Put ten drops of the water on a clear pie pan. Let the water evaporate. What is left? Pour all the water into the pie pan. Let the water evaporate. (This may take a few days. Ours took a week and started growing mold before all the water evaporated, so we made sure K. kept her fingers out of it.)
    • Add a spoonful of oil to a glass of water. What happens? Stir the oil. What happens? Stop stirring. What happens?
  • Ice
    • Get two ice cubes the same size. Wrap one in a wash cloth and close it using a rubber band. Put them on a pie pan in a warm place. Which melts first?  The cloth keeps the warm air from getting to the ice and keeps it from melting as fast.
    • Take two ice cubes that are the same size. Wrap one up in aluminum foil. Put each in its own glass of warm water. Which melts first?
    • Fill an ice cube tray with water all the way to the top. Put it in the freezer. What happens when the water is frozen?
    • Fill two glasses with warm water. Get two ice cubes. Crush one by wrapping it in a piece of paper and standing on it. Put the ice cube in one glass and the crushed ice in the other. Which melts faster? Each little piece of ice has warm water around it, so it melts faster.
    • Get three containers that are different shapes (shallow bowl, glass, make a shape with aluminum foil). Put exactly 1 cup of water in each container. Allow them to freeze. Set them out and see which melts fastest.

Monday, June 17

Second Grade, Science, Set Four

Now we are learning about light.

In the book What Happens If . . ? there are a few pages of experiments with shadows. You will learn that when your hand is close to the light source your shadow is larger because it blocks a lot of light, but when your hand is farther away from the light source your shadow is small because it blocks less and less light. We used different items to make shadows, seeing that some shadows are black and some are 'gray' because the material lets some light through. We cut an egg shape out of butter muslin and a chick out of paper. We taped the chick in the middle of the egg. The shadow looked like a chick inside an egg.

 
Here is the fabric egg and cloth chick.


Here is the shadow.

Science: Understanding Your Environment also has a chapter on light. We read about light and heat energy. We learned that where there is heat there may be light and where there is light, there is almost always heat. We used a thermometer to find out the temperature of ice water and tap water. We looked around the house for light sources, heat sources, and items that gave off both light and heat. We read about light being reflected and found things in pictures and around the house that reflected light. We used two small mirrors and a penny to see how many reflections we could make of the penny. We put five colorful blocks in a paper bag, then I had K. stand in a dark closet and look in the bag to see what colors she could see. So we discovered that there must be light to see colors. We found items around the house that light could go through and items that light could not go through.

We did a couple experiments from the book 365 More Science Experiments.
  • We used a glass of water to magnify the small writing on a box of pudding. page 53
  • We made a movie screen by putting a small hole (about 1" x 1-1/2") in opposite sides of a box. Then I gave K. a clear transparency with the size of the hole marked and markers. I asked her to draw a picture in the box. We put a piece of white paper on the wall, held the box close to the wall and shone a flashlight through the two holes. We could see the picture. Then we moved the box farther from the wall. The picture became larger, fuzzy, and unclear. As the light source moves farther from the wall the light same amount of light spreads out to fill a larger area. page 53

In Let's Experiment:
  • We made a kaleidoscope with some colored beads and 3 small mirrors. Arrange two stacks of books to be about 10 inches tall. Put a piece of glass across the stacks and put some colorful beads on the glass. Take three small mirrors and arrange them into a triangle. You can hold them together with tape or rubber bands. Hold the mirrors about two inches above the beads and discover how a kaleidoscope works. page 110
  • We have a periscope, so we didn't make one. Instead we played "Hide and Seek" with it. One of us chose a location in a bedroom (must be in plain sight). The other person stood outside the room and used the periscope to locate the person in the room.
  • Bending light (putting a straw in a glass of water) takes place every time the light waves pass from one medium to the next.
  • We proved that air bends sunlight. Place a stack of books on the table. The stack should be almost as tall as a large glass jar. Put a short (2 inch) candle about 2 feet from the stack of books and light the candle. When you look straight across the top of the books you should not be able to see the candle. (If you can make the candle shorter.) Then fill the jar to the brim with water and screw the lid on. Lay it down next to the stack of books and look across the books, through the jar. You should be able to see the candle.
 
You can't see the candle.

 
Here you can (we held a dark paper behind it so the camera would get a better picture).
  • Experiment showing that when you add water to a bowl, the light refracts (bends) so that while looking across the top edge of the bowl, you can see the penny on the bottom of the bowl.
  • We made a pin-hole camera. It only works well if you are looking at something really bright and are in standing in a dark room. It worked well while we were standing in my parent's kitchen and looking at the open blinds where the sun was shining in brightly.
  • Putting light back together. Take a 4 inch diameter cardboard circle. Divide it into sixths. Color each sixth a different color: red, violet, blue, green, yellow, and orange. Poke a small hole in the center, insert a toothpick and glue it in place. When the glue is dry, stick the toothpick in the chuck of a drill. Hold the drill so you can watch the disk and turn it on. At a certain speed, all the colors will blend and you should see a white disk. Ours didn't get white, but it did get pink. Maybe our red was too dark.
In Why Does Light Cast Shadows? by Jacqui Bailey
  • We learned about our eyes, and watched our pupils get smaller when we went from a dark room to a brightly lit room.
  • Sun and Shadow. We went outside and I traced K.'s shadow with sidewalk chalk. Then a couple hours later we did the same thing to see how our shadows change. We talked about why.
In Experiments with Colors by Salvatore Tocci
  • Separating the colors in black. Flatten a coffee filter and draw a line across it with a black water base marker (not permanent). Put water in a glass. The water should be about 3/4-inch below the black line of the filter. Roll the filter up and put it in the water. Watch the water flow up the filter. When the water reaches the top of the filter, take the filter out and let it dry. How many colors do you see? Black ink is made of a mixture of colors.
  • Turning black and white into color. There is a black and white circle on the page to photocopy. Cut it out and glue it on cardboard. Make a small hole in the center. Stick a toothpick through and glue it in place. Spin the circle like a top (the circle should spin between five and ten turns per second). You should see colors. We sorta did.
  • Turning Blue. We learned why the sky is blue. In the experiment, K. dropped milk into a glass of water until the water looked blue. The sunlight hit the milk particles and reflected blue to our eyes, just like the sunlight hits the dust particles in the air, which reflects blue to our eyes.

From Mirrors: Finding out about the Properties of Light by Bernie Zubrowski
  • We played a game of hide and seek using four small mirrors on the table. We each put our chins on the edge of the table and then "It" tried to find the other person using all four mirrors.
 
Here you can see the mirrors taped onto boxes to make them stand up.


It was very difficult to get a picture in the mirrors.
Here you just see K. with two mirrors, but we did get it with all four!
  • We played another game with the four mirrors. We taped eyes on one, ears on another, a nose on the third, and the mouth on the fourth. Then tried to line up the mirrors so we could see the face correctly in a mirror. We succeeded, but the nose and ears aren't quite right in the picture.
 
Books we read:
  • Light: Shadows, Mirrors, and Rainbows by Natalie M. Rosinsky -- this is an easy reading book with large, colorful illustrations.
  • Shadow-Play by Paul Fleischman -- this is a picture book about two children who see a play at the fair, but at the end you find out that the people in the play were just shadows.
  • The House in the Night by Susan Marie Swanson -- a picture book naming night time things
  • Eli-s Night Light by Liz Rosenberg -- a picture book about a boy's night light burning out and all the things he discovers that bring light into his room
  • Sun Up, Sun Down: The Story of Day and Night by Jacqui Bailey -- a picture book about the sun and the rotation of the earth. At the end of the book it shows how to make a sun dial
  • Lights for the Night: A First Look at Illumination by Solveig Paulson Russell -- I skipped over some of the stuff at the beginning of the book, but I have divided the book into sections and we are reading some each week.
  • Sisters of Scituate Light by Stephen Krensky -- a picture book story about two sisters that are left to take care of the lighthouse, and how they scare the British away during the War of 1812. This is a true story.
  • Fireflies in the Night by Judy Hawes -- this is a Stage 1 Read-and-Find-Out Science book
  • How Do You Know It's Summer? by Ruth Owen -- a picture book about summer, and the longest day of the year

Sunday, April 28

Second Grade, Science, Set Three

Now we are learning about air.

We started out with The True Book of Science Experiments. We completed pages 6 - 22 over three days. This wasn't rushing, as the experiments are very simple. K. would read the text and then we would do it. Here are pictures of some of our experiments.

 
The glass is full of water. Air pushing against the paper keeps the water from running out.

 
Put your finger on the end of the straw to keep air from entering and pushing the water out.

 
Our siphon worked!!! Air pushing on the water in the bowl forces it into the tube to fill the bucket. After we emptied the bowl, we switched the bowl and bucket and emptied the bucket into the bowl.
 
 
Here is our weather vane.
 
 
I'm planning on doing a project from Projects with Air each week. This is our Land Yacht. We used the raft we made in history in Set Two because we didn't have balsa wood. We haven't had enough wind to see if it works.
 
 
We completed pages 4 - 13 in the book What Happens If? These were experiments with balloons. It is really hard to get pictures of balloons that are speeding around the room or through water in the bathtub, so we have no pictures of them. But they were a lot of fun to do!
 
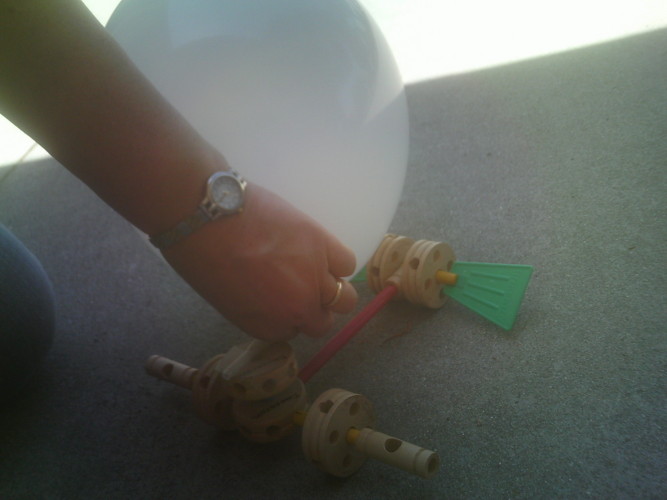
We did two projects from Projects with Air. The first was a Balloon Powered Racer. We were supposed to use balsa wood to make it, but we didn't have any, so in order not to spend money, we used Tinker Toys. At first we had a regular size straw, but it didn't allow the air to escape fast enough to move the racer. I found an old lip balm tube. We disassembled it and sawed one end off. Then the racer worked, although if I blew the balloon up too big it would sit on the wheels and not allow them to roll. Here are some pictures.


Our second project was making a pinwheel. We took it outside and let it spin in the wind.
 
In Fun with Science we did pages 29 - 33, learning the effects of fast moving air. Then we made and flew a boomerang.
 
For our parachute experiments, we started with the book 365, page 29. When we had completed that, we switched over to Projects with Air. It had us cut holes in the parachute until it no longer floated down, but jut fell. When we stopped, the parachute was more holes than plastic, but it was still working.
 
Here are a couple videos of other experiments from 365. In The Talking Coin as the cold air in the bottle warms up and expands, it makes the the coin on top pop up a bit as it lets the air out. With Launch Your Astronauts, the air from the blow dryer pushes the ping pong ball up as gravity pulls it down. Because the air from the dryer is flowing faster than the air around it (lowering the air pressure), the ball stays above the dryer.
 
The Talking Coin
 
Launch Your Astronauts
 
From Projects with Air we did an experiment, tacking wrapping paper, lined paper, cloth, and yarn to pencils. Then we put them out in the wind to see which blew best.
 
We completed more experiments from 365 this week.
  • The Collapsing Bottle -- use very hot water to get the air inside a 1 or 2-liter bottle hot. Then screw the cap on tightly and put it in the freezer. The bottle will collapse because hot air takes up more space than cold air.
  • The Wonderful Whistle-Stick -- put a hole in one end of a paint stirrer and tie string or yarn to it. Then in the other end put one, two, or three holes. Swing the stick around fast and listen to it whistle. You can try having different sticks with different numbers of holes and listen to the different sounds. The air passes through the holes at a higher speed than the air going around the stick, which causes the whistling sound.
  • The Collapsing Tent -- take a small sheet of paper and fold it once, creasing it like a tent. Blow a steady stream of air through the tent. The tent collapses because the air pressure above the tent is greater than the pressure of the moving air through the tent.
  • The Singing Balloon -- blow up a balloon, stretch the neck while you let the air escape to hear it sing. The air exiting the balloon causes the balloon to vibrate, which causes the sound.
  • The Rising Notebook Trick -- put a balloon under a book, blow up the balloon. The air pressure in the balloon causes the book to rise.
  • Real String Soap in a Bottle -- take an old dish soap bottle, or other soft bottle with a small hole in the lid. We used a shampoo bottle. Remove the lid and put the string (we actually used a piece of round elastic) through the whole. Tie a knot in each end of the string that is large enough so it won't go through the hole. Put the lid back on the bottle. Put the string into the bottle. Quickly squeeze the bottle and the string flies out. The air pressure leaving the bottle pushes the knot that is covering the hole and makes the string fly out.
This week we did more reading than experiments. The following experiments are from 365.
  • Oddballs -- blow up two balloons to about the size of large oranges. Tie each to the end of a string, about 1 yard long. Arrange the string over a fixture so the balloons hang evenly and about two inches apart. Blow a rapid stream of air between the balloons. The balloons move toward each other. This is because moving air has lower air pressure than stationary air, so the higher air pressure on the outside of each balloon pushed them together.
  • High Rollers: A Big Wind! -- put two cardboard toilet paper rolls about an inch apart. use a straw to blow a steady stream of air between them. The rolls move together. Same reason as Oddballs.
  • Spinning Wheel: It's Wheel Science at Work! -- this one has a lot of instructions, so here is the video.

Books we read:
  • The Boxcar Children: The Mystery of the Hot Air Balloon #47 -- fun story, and it does teach about hot air balloons.
  • Air: Outside, Inside, and All Around by Darlene Stille -- easy reading picture book that teaches what air is made of
  • The Air Around Us by Eleonore Schmid -- picture book that teaches about wind
  • Spy in the Sky by Kathleen Karr -- a historical fiction chapter book about the Balloon Corps during the Civil War
  • Sally's Great Balloon Adventure by Stephen Huneck -- picture book, fun story about a dog that accidentally goes up in a hot air balloon
  • The Balloon Boy of San Francisco by Dorothy Kupcha Leland -- historical fiction story that takes place in 1853. This is also a good book if you are studying California history.
  • Catch the Wind! All About Kites by Gail Gibbons -- at the end of the book it tells how to make your own kite.
  • Wind Power by Norman F. Smith -- we just read through page 29. It was getting too detailed for second grade interest level. However, it had a demonstration for us to do that really helped K. understand that cold air sinks. Open your refrigerator a couple inches. Where do you feel the cold air coming out? It is at the bottom on your feet, not at the top on your face.
  • Air is Everywhere by Melissa Stewart -- if you wanted to do just a one week unit on air, this is the book. It has large colorful pictures, large print (not too much on each page), and fun, simple activities.
  • The Amazing Air Balloon by Jean Van Leeuwen -- picture book of historical flight in 1784
  • The Glorious Flight by Alice and Martin Provensen -- picture book of Louis Bleriot's flight across the English Channel.

Sunday, March 24

Second Grade, Science, Set Two

We are continuing to do experiments with magnetism. Here are some of them:


  • I put a paper clip in a glass and asked K. to get it out without touching the paper clip. You can see her using a magnet to do it. True Book of Science Experiments pg 27

  • We gathered seven magnets and tested each to see how many paper clips it could pick up. This showed us that some magnets are stronger than others. Science: Understanding Your Environment pg 86
  • We made a needle into a magnet. The Real Magnet Book pg 40
  • We learned that magnets push and pull. Real Magnet pg 44 
  • Here is an experiment showing the magnets pushing each other apart. Let's Experiment pg 64

  • Here are iron filings "dancing" above a magnet. Let's Experiment pg 67
  • We made a vending machine slug rejector. Let's Experiment pg 71
 
  • We made a switch to use for our electromagnet experiment. Let's Experiment pg 73. Do not use this switch with any power source except household batteries, such as D cell batteries.

  • Here is our electromagnet. Let's Experiment pg 57 and Real Magnet pg 55
Book to read:
  • Amazing Magnetism by Rebecca Carmi -- this is a Magic School Bus chapter book

Now we are experimenting with electricity. We started this week with Static Electricity.
  • We experimented with balloons Science: Understanding your Environment pgs 93 - 95
  • We played with static charges using glass rods and plastic combs and a ping pong ball Let's Experiment pgs 96 - 98
  • We read Amazing Electricity by Sally Hewitt -- this book has good pictures, short text, and things to do or talk about on each page spread.

  • What Happens page 23 -- we discovered how a flashlight works by making one. We taped four D batteries together so we would have a brighter light. We started with one. There was hardly any light, so we added a second battery and it was brighter. Then we decided to add a third and the light was even brighter, so we added the fourth for a very bright light. After doing the experiment in the book, we decided to hook it up to the switch we made. It was so much fun because it actually worked!
  • Let's Experiment page 102 -- we tested different items to see if electricity flowed through them. This didn't work at first because our light bulb was different than theirs. Ours had to be touching the top of the battery and have the wire touching the side of it, too.
Other books we read:
  • How does a Waterfall become Electricity? by Mike Graf -- good book, easy to read and understand with good pictures and illustrations.
  • Electricity: Bulbs, Batteries, and Sparks by Darlene Stille -- very easy book to understand with large, colorful illustrations
  • Electric Storm by Anne Capeci -- this is a Magic School Bus chapter book.
Recommended book:
  • Why it Works: Electricity by Anna Claybourne -- we didn't use this book, because it covers the same things as in the other books and the experiments we did, however, if you don't have any other books already, this is a good one to use.